While working on the Matching Quiz, I realized Javascript is missing one of my favorite Python functions: Range. For those who don't use Python, Range allows you to generate a list of numbers. It doesn't sound useful on the surface, but trust me it is. Note I will be using the term list and array interchangeably throughout this article. I'm lazy like that. In Python, range is often used to generate enumeration for loops. In my case I needed to generate a list of numbers in random order. This controls the sorting for the Matching Quiz. Now Python's Range function doesn't do randomization by default, it's something extra I added for my use case. So how do you use Range? It's simple, let's walk through the parameters.
Parameters
The start parameter is the lowest number in your generated set of numbers. For example if you're wanting a list of numbers from 1 to 10, you would specify 1 for the start parameter. Next is the stop parameter. This tells the script to stop generating numbers, however it is not included in the list of numbers. For example if you wanted a list of numbers from 1 - 10, you would have to specify 11 for the stop parameter. This behavior may seem odd at first, but this is how Python implements the function. Next is the step parameter. This parameter is optional. But this allows you to control how many steps between each number in the list. For example, say you want only odd numbers from 1 - 10 in your list. You would start with 1, stop with 11 and step with 2 (range(1, 11, 2)). The end result would be [1, 3, 5, 7, 9]. Pretty neat huh? Ok Matt, what's the random parameter? "randomize_order" is an optional bonus parameter I added for my use case. I needed the numbers to be returned in a random order. It defaults to false, so if you don't pass it. You'll end up with a standard list of numbers.
        function range(start, stop, step = 1, randomize_order = false) {
            let arr = [];

            for(let i = start; i < stop; i += step) {
                arr.push(i);
            }

            if(randomize_order) arr = arr.sort(() => Math.random() - 0.5);

            return arr;
        }
Conclusion
Feel free to grab and use the code as you like. As always it's not our responsibility for damages (if they happen). Yotta yotta. But this is a great away to have the best of both worlds when switching back and forth between Python and Javascript.
I've been working on putting together a matching quiz app as part of an upcoming feature on my tv and movie car blog. But I wanted to make it reusable by myself and others. How did I pull that off? Well with the power of JSON! Wow, that really does sound like something He-man would say. But anyways. I wrote a basic script to build the quiz using some classes and objects. Then added in some objects to validate and score the quiz. To make it reusable I added in a parameter in the query string to allow the user to pass in a URL for the JSON configuration file (details below). When the parameter "source" is passed the script will load the JSON configuration file from that path and setup the quiz.
Build Your Own Quiz
Building your own quiz is pretty simple. All you need to do is create a JSON configuration file using the template below. Upload the completed JSON configuration file to a public site that allows CORS. I used npoint.io. If using npoint.io, once you've upload the file they'll issue you a special URL. Save this address. Now for the magic. Copy the following URL and replace "" with the special address you saved earlier. Open up the new address in your browser and the quiz will be live. You can share this link with anyone. Or in my case I'll be embedding it in my blog in an iframe like above.
Every now and then, you find yourself doing a repetitive task. After about the third or four time, you're like "I can automate this." I find myself doing this all the time. Sometimes I can find ways to automate, sometimes I'm just out of luck. But this time I was able to. So I thought I would share this script I wrote and have found useful. Let me try to explain what it does.
The Problem
I write another blog about tv and movie cars. Every so often, I do post about upcoming streaming offerings of movies and tv shows that feature cars. I like to feature the posters of the movies in the post as a panel. Or at least that's the only terminology I can think of to describe it. You can see an example of this above. If you can think of a better name or know the proper name. Let me know! For years, I would throw the posters into MS-Paint. I would find the smallest poster by height and then add them all manually. For a three or four poster panel this would take me a few minutes. I finally said, enough is enough. Let's automate this. But how?
The Solution
For the last year or so, I have been studying Python. Just so happen to stumble across a Python library called Pillow. This library is just for working with images. It can do all kinds of stuff! So after thinking through the steps I would have done in MS-Paint, I was able to recreate that process in a Python script. Feel free to checkout the result below and copy or use it for your own use. As always, no warranties and we assume no reasonability for damages.
# Name: paneler
# Description: Merges all of the images in the 'files' directory into a single inline panel image.

import os
from PIL import Image

dir = "files"

files = os.listdir(dir)

smallestHeight = None

# load images into an list
images = []

for idx, file in enumerate(files):
    images.append(Image.open(f"{dir}/{file}"))

    # track the smallest height
    if smallestHeight == None or images[idx].height < smallestHeight:
        smallestHeight = images[idx].height

newWidth = 0
newHeight = smallestHeight

# resize all other images to match smallest height
for idx, image in enumerate(images):
    if image.width != smallestHeight:
        image.thumbnail(size=(images[idx].width, smallestHeight), resample=Image.Resampling.LANCZOS)
        newWidth += images[idx].width

# build a new image
newImage = Image.new(mode="RGB", size=(newWidth, newHeight), color=(0,0,255))

left = 0

# add images to new image, increase left by current width
for idx, image in enumerate(images):
    newImage.paste(image, (left, 0))
    left += image.width

newImage.save(f"{dir}/newimage.jpg")
Dashy is a wonderful app for keeping up with all the goodness on your home lab. You can use it to keep track of all your web services and interfaces. It will even ping your services for you and let you know their status. However, it may not be the easiest thing to get going. So I thought I would share how I deployed Dashy in my home lab environment. I like to use Portainer to manage my docker images and containers. With these easy to follow steps you can have Dashy running using Portainer in no time flat.
Step 1: Grab Dashy Docker Compose
Copy The Following
---
version: "3.8"
services:
  dashy:
    # To build from source, replace 'image: lissy93/dashy' with 'build: .'
    # build: .
    image: lissy93/dashy
    container_name: Dashy
    # Pass in your config file below, by specifying the path on your host machine
    # volumes:
      # - /root/my-config.yml:/app/public/conf.yml
    ports:
      - 4000:80
    # Set any environmental variables
    environment:
      - NODE_ENV=production
    # Specify your user ID and group ID. You can find this by running `id -u` and `id -g`
    #  - UID=1000
    #  - GID=1000
    # Specify restart policy
    restart: unless-stopped
    # Configure healthchecks
    healthcheck:
      test: ['CMD', 'node', '/app/services/healthcheck']
      interval: 1m30s
      timeout: 10s
      retries: 3
      start_period: 40s
Step 2: Creating New Stack
Navigate to Stacks
Click the "Add Stack" button (upper right corner)
Give your Stack a name. I called mine "Dashy"
Paste the compose from above into the Web Editor
Modify port configuration if needed. Defaults to port 4000
Scroll down and click "Deploy Stack"
Dashy will finish the rest. After that you should be able to access it on Port 4000 on the same server as your Portainer instance or whatever port you've configured. That was easy wasn't it? As always, use this at your own risk, we are not responsible for damages. Enjoy and stay safe!
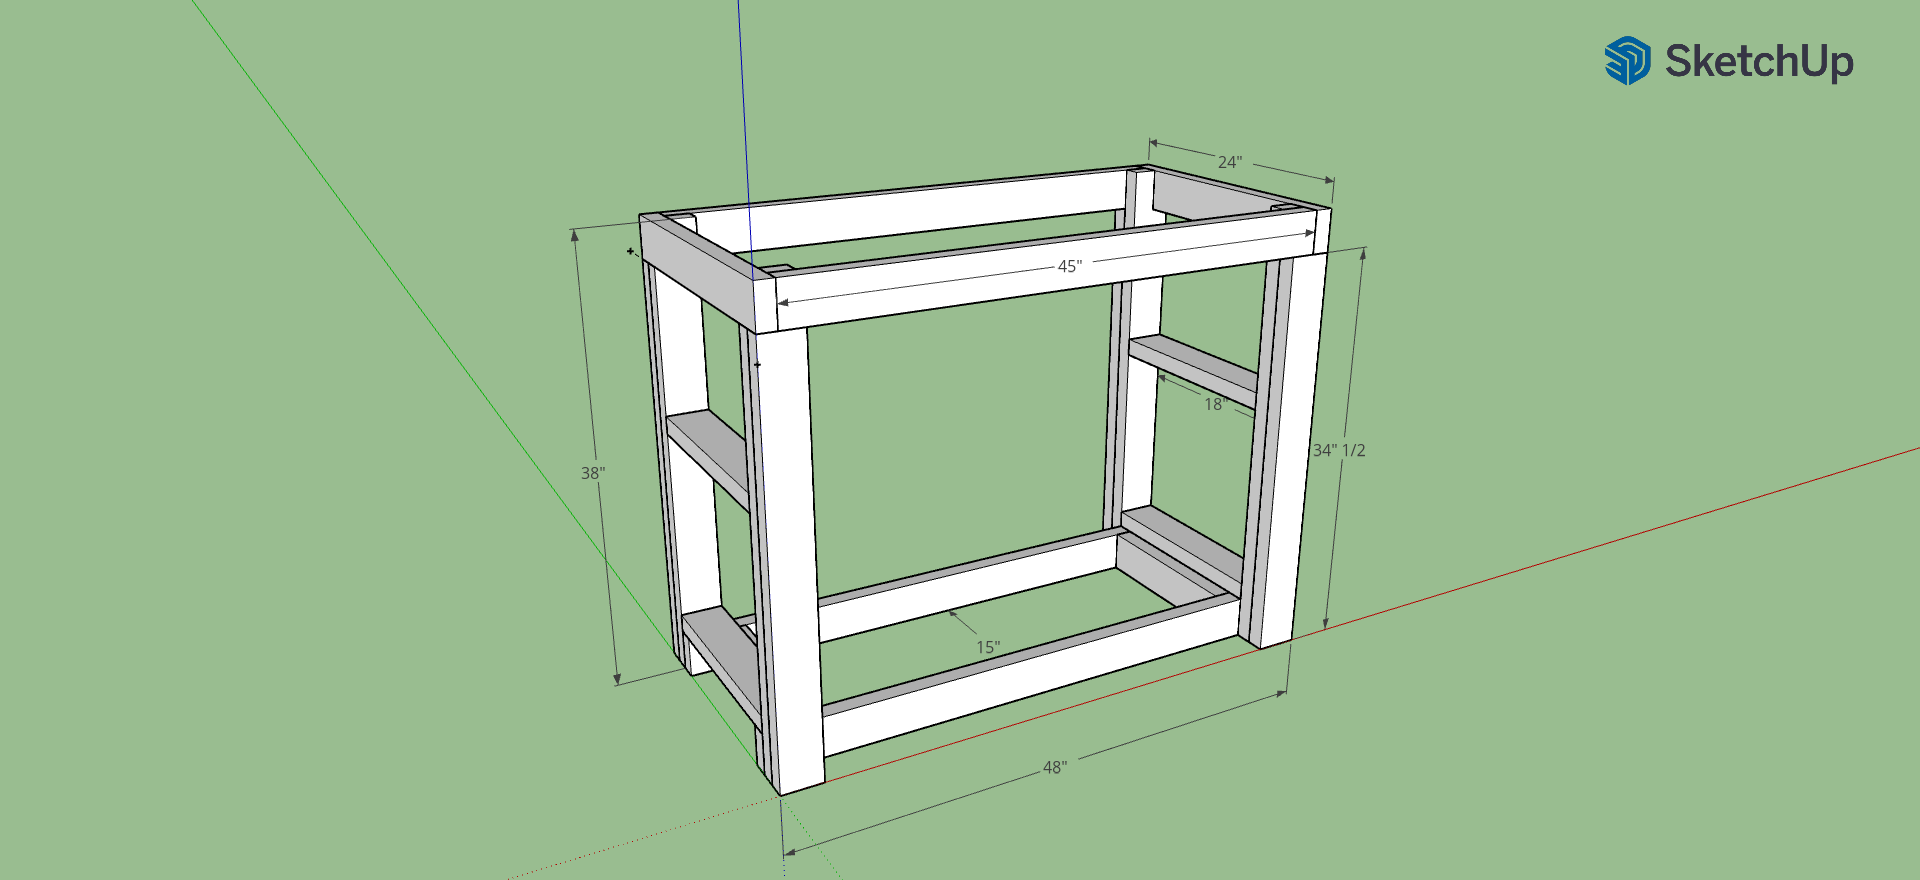
I recently decided to get back into woodworking. With that I needed to clear some space and build a proper work bench. I didn't want to just do sketches on paper, so I decided to learn Sketch Up. I have to say, I may never do another project without it. Doing it in CAD first, really helped me visualize and save time on manual measurements. After making the sketch, I found it much easier to build a cut list. The frame is constructed with 2x4 dimensional lumber, I sourced from a local big box store. Above is the result of my sketch session. All units are in inches. I left the bench top and lower shelf plywood off for visibility. Feel free to download the Sketch Up file if you would like to see more details.


 Introduction